Do you love how your handicrafts look? Don’t let the photographs of your handicrafts hinder its beauty!
 Learn how to elevate your photography skill and the basics of using Photoshop to show off your handicraft creations exactly as they are— gorgeous!
Here’s how to get started:
How To Photograph Your Handicrafts
Shooting a great image is the first step in obtaining a great photo of your products; and picking the right location with proper lighting is necessary to achieve the look you want for your handicraft photos.
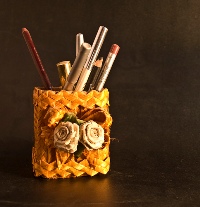
- Photograph your crafts in a well-lit area or an isolated area with good lighting just like the photo above.
- You can also try photographing your crafts with a plain contrasting background (white for dark crafts, black or brown for light crafts) to accentuate its look.
In addition, avoid photographing your crafts with a messy setting (no cut pieces of yarns, cloth, or other clutters). Same goes to photographing your crafts on your sofa or bed (unless of course you are photographing a quilt). Also, never photograph your crafts in the dark or just using a camera flash as a source of light.
How To Use Photoshop For Your Craft Images
After shooting your products, spend a little while editing the images using Photoshop. Using Photoshop can do wonders to enhance or re-touch your handicraft images, so the photograph will have that wow factor, making the images you use to sell your handicrafts online more inviting and just as stunning as the real thing.
Here are some tips for you:
Photographing Your Products With A Model
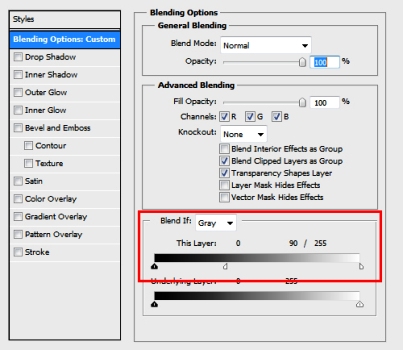
Sepia is great if you have a model wearing or holding your product. To develop a black and white image with a sepia look, Click on Layer → New Adjustment Layer → Photo Filter, and select the Sepia filter, with a density of 100%. Double-click the layer (not the layer name) to open up the Layer Style window. This will show the Blending options.
You will see a white slider at the bottom of the dialog box for the first gradient, move it to the left while holding the Alt/Option key. This creates a smooth transition between adjusted and unadjusted areas. The sepia will now look elegant just like below.
Retouching
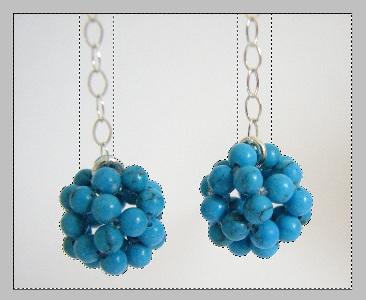
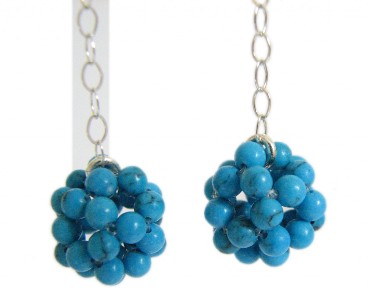
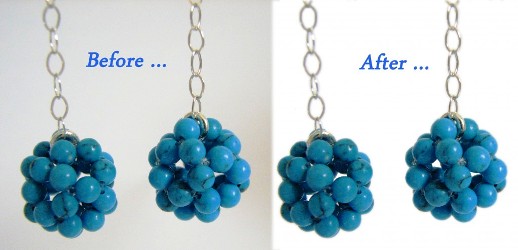
Retouching is easy by using the Magic Wand tool. First, select the background. Small “pebbles” left in the background were added with the Shift + Rectangular Marquee selection. Unselect the chain area because to give that area a special treatment. After everything is selected, make sure that the selection feather is 4 pixels.
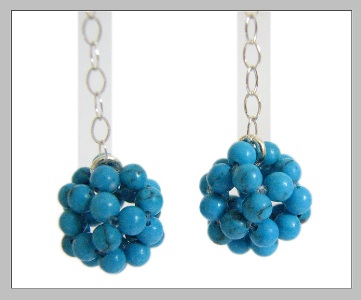
Press delete (don’t forget to set your background colour to white first …) to get a clean and neat background.
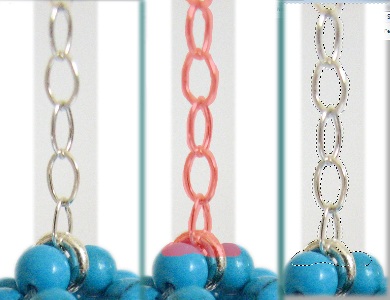
Now this is the interesting part, zoom in on the chain. You can use a “quick mask” to color and select the chain. Just press ‘q’ to enter Quick Mask mode, then using the Brush tool with the correct width, color the chain and some of upper beads, just to make sure you don’t erase them. Pressing ‘q’ again exited the Mask mode and selected all the red area that you painted.
Now using the eraser tool, you can quickly erase all the background around the chain, leaving a nice clean chain with white background.
Now do the exact same procedure on the second chain, and voila! I have a great looking photo with clean sharp white background.
See the huge difference?
Credits to Beads By Roni for the tutorial and images.
Blurring The Background
Some products need to be photographed outdoor and backgrounds often ruin what is an otherwise perfect picture. Even if the subject is perfectly framed and focused, things in the distance can prove an insurmountable distraction.
Here’s how to blur out the background:
Open the image file
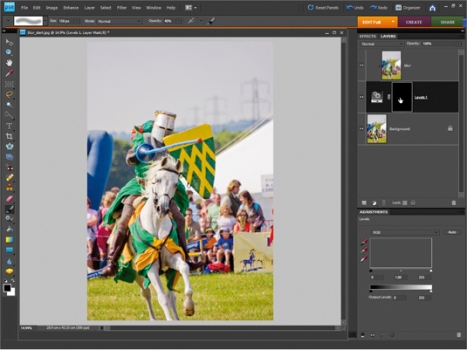
Open the photo of your choice in photoshop and duplicate the layer (go to Window>Layers if it’s not). Right-click on the ‘Background’ layer icon in this palette, and choose Duplicate Layer. Rename this layer ‘Blur’ in the window that appears. Click OK.
Add blur by using a filter
From the Filter drop-down menu at the top of the screen select Filter> Blur> Gaussian Blur. Set the Radius to the amount that makes the background look as out of focus as you want it – around 70 should do the trick. The main subject will also appear blurred, but don’t worry about this now. Click OK.
Create a ghost layer
Click on the half-moon icon in the Layers palette, and pick any of the Adjustment Layer options. We’ve chosen Levels. Don’t move any of the sliders – you’re simply going to use the mask that comes with this layer to control which parts of the pictures are sharp, and which are blurred. If using Elements 7 or earlier, you’ll need to click OK.
Cheat the system
There’s some jiggery-pokery needed to get the mask to work as we need it to (unless using Elements 9, where this workaround is not necessary). Drag the ‘Levels 1’ Adjustment Layer below the ‘Blur’ layer in the Layers palette. Now press the Alt key and hover the cursor between the ‘Blur’ and ‘Levels 1’ layer; when a double-circle symbol appears, left-click with the mouse. The ‘Blur’ layer icon will then move to the right.
Get out the paint brush
Click on the white rectangle in the Levels layer. Press Alt+Delete, and the mask becomes black (and the original image is revealed again). Grab the Brush tool and select a soft-edged brush from the preset picker. Set Size to 500 pixels and Opacity to 100%. Set the foreground colour to white (press X). Paint over the background to reveal the blurring beneath.
Fine tune the mask
As you get closer to the subject, you need to reduce the size of the brush (use the [ key as a shortcut), and the Opacity (press the 7 key to reduce to 70%, 4 for 40% and so on). Take your time creating the mask, so you can’t see the joins. Alt-clicking on the mask icon enables you to see (and paint on) the mask, and to highlight areas you might have missed.
Credits to Craft Blog for the tutorial and images.
For a more detailed instruction, please check this guide from WikiHow.
If you would like more instructions on photoshop and how to use it for all sorts of things then check out Photoshop Café where they have a range of different tutorials that you can watch for free.
That’s it for now. Don’t forget to subscribe to our blog and learn more about improving your craft business.
- DIY Chicken Wire Jewelry Holder - June 27, 2022
- Jewelry Designer Manager Alternative - December 8, 2019
- 3 Tips To Immediately Boost Your Sales Today - May 12, 2019

